
5 Tips and Tricks for Renderings Using Ajax


Eventually a component on a page is going to need to pull in some new information and you don't always want to reload the whole page. Making use of Ajax allows you to avoid a full reload but when you use Ajax with Sitecore there are a few important things to keep in mind:
  1. Make sure you set up your controller to function with the Ajax call.  Are you sending back some data, the whole rendering, or are you just updating something internally? Be ready to handle whatever is coming into or out of the controller. Note that if the Ajax function is posting data you must add [HttpPost] before the controller method.
  2. Regardless of how you get to your controller - there won’t be Sitecore context! Your controller has no idea what the user was doing or where they were on your site when the Ajax call was made. You need to pass all the information in your model to the controller including the data item and anything else relevant for your controller to give context. One way to give context is to output a relevant ID (or the Sitecore Context ID)  somewhere on the page. You can then grab the value via javascript to pass back to the model for when you lose context.
  3. Data can get complicated when passing back and forth between controller and JS - create a model which represents the data you’re working with to keep things clearer. The simplest way to do this is to use strings/integers etc for the fields you need to pass back and forth via JSON. Something like Quicktype.io ( https://app.quicktype.io/ ) can help you quickly generate C# models from your JSON (or other) data to use with the controller on the server side.
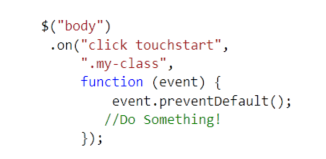
  4. Event binding can be lost if content is being reloaded via Ajax depending on how it was bound initially. If you have other javascript tied to any part of the component or page that’s being updated - either make sure that your javascript around those components is bound to something other than itself (such as the body tag), or that you run the js again once the call is complete. Otherwise, you’ll find the js runs once, and then isn’t firing since it was being bound to items that no longer exist.

    For example, some jQuery to bind to body for a click event: 
    An example ajax call:
  5. Don’t load your entire site to test a single controller, use Postman (or something similar) to test out your controller without needing to hit the page! This way, you can make sure your Ajax calls will work with the controller.  https://www.getpostman.com/


Comments

Post a Comment

Popular posts from this blog

Using the Source Property

For each of the properties in your template you can set a source for it, this isn’t always used but can improve user experience drastically when done throughout a site. The source field comes in to play whenever you are using any of the following fields: Droplink, Droplist, Droptree, File, Grouped Droplink, Grouped Droplist, Image, Multilist, Treelist, Rich text field and a number of others. There are various ways of setting these up to achieve different results – but in general you are using the source to limit the set of items that can be used, and this requirement can also help you determine what kind of field to use. For example, if you have a Set of items all split down into sub folders and want the content editor to make use of the tree, you could use a TreeList or Drop Tree, but if you just want a set of items without the opportunity to see where those items are – multilists or droplinks are the way to go. For Images you’re generally just specifying where to look for and put th

Adding your own Icons

I have returned from blogger oblivion – stay tuned for more frequent updates! I’m looking forward to meeting people at Dreamcore this year – I’ll  be sure to update as that is happening. Back to the topic: adding your own icons! As you may have noticed, items can be configured to have an icon – and Sitecore provides an extensive list of them. But you may want to add your own for whatever reason. To do this you’ll need an image suitable for making into an icon, and the ability to resize this image to the correct sizes (Paint.net, Photoshop, GIMP). For our example we’re making an Arke Icon and we're going to say our largest icon will be 128x128, so we have a transparent png called logo.png to work with:  The image you want to use should have a transparent background unless you want the icon to be a square, and ideally not overly detailed as it will be very small. Next, we need to make this image into various sizes, and put logo.png into the appropriately named directories, the st

Links as Items Redux!

Previously I had posted on how to set up items in your content tree to act as external links to other pages (for use with Navigation mainly – for example if you have a blog elsewhere but still want it listed in the main navigation). However, Ivan Buzyka pointed out some issues with the simple implementation so I added creating a better redirect to my ‘to do’ list for the blog. The time has come! Let’s pretend we are modifying an existing site, we don’t want to change the navigation so that won’t be covered here – we just want to update our layout to work a little more universally. Our new items need to be able to link to an internal, external or Media item reliably for display in our navigation. Our template will consist of similar things to last time: Link: General Link Nav Title: Text -> standard values: $name In Navigation: Checkbox ->standard values: checked Create the template, add in standard values for it with the above settings and now we can create our Layout which shou